Clock-In Lock

Clock-In Lock
"Clock-in Lock" restricts the location where the employees can clock in. IF the employee is outside the expected job area, the job will not allow the employee to clock-in.
The task (job) must have an address or coordinates attached for this to work.  Next, click on "Create Customer SmartFence." (A default fence can also be created and applied for multiple jobs.  If you go this way, make sure to follow the next steps when setting up the Default fence first, then you can select Default on the SmartFence option within the task and click on Save to complete it.)
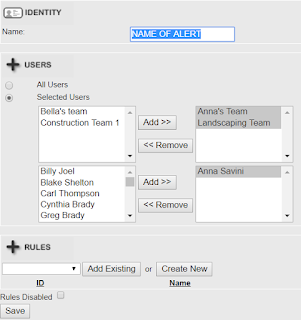
Name the rule as you see fit.  Use the Search option to find the address and set the radius to the desired size. Next, click on "Create New" in the RULES section.

Next, setup the Clock in "Lock rule and parameters".  Open the Trigger drop-down menu and select the option "Clock In Lock Within Area":
Next, click on "Lock Phone" if you want employees not to be able to punch in to the job unless they are inside the specified area.  Leave this option disabled will allow them to select the task, but you can always create an alert to be notified whenever this happens.  When this is ready, click on SAVE to go back.
You will notice that the "Rules" section will be populated with the rule you created in the previous step.  Click on "Add Existing" to apply the rule.
When the rule is successfully applied, you will see it listed below  under ID and Name

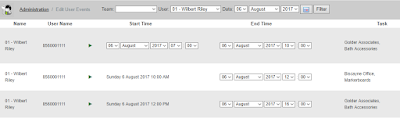
Next, we will cover how the "Clock-in Lock" feature works on the mobile device.  At the beginning of the day, you will be clocking in as normal, by seleting as task from the "Tasks List"


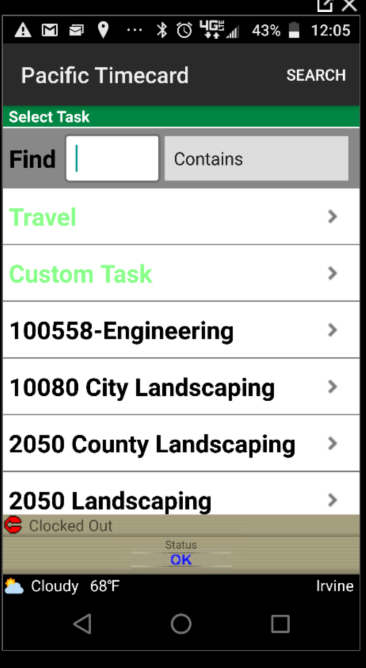
This time, these tasks will have the address and clock-in lock rules attached to them.  The device will use the current location and compare it to the expected location.  If outside the correct area, the clock in will not be accepted, if inside the clock in will be successful.
The device could take a little time to get the location, so a message could be sent with suggestions as to what to do to improve the GPS signal.  On the other hand, if you are outside of the expected area, you will get a message telling you that you are at the wrong location for the selected task, and the clock in or change task action will be unsuccessful.
If you have any questions please contact us.

Runtime Report

Whenever employees enable or disable the GPS tracking on the phone settings, it will generate an entry in the GPS Runtime Report:
 
This report is incredibly useful because there can be times where for some reason the  GPS tracking is not ideal on one of the employees, or there are empty spots in-between the breadcrumb train.  You can generate this report and confirm if the GPS was enabled or disabled at that point during the day

GPS-Google Traffic Timecard Map

First log into the Web Portal the first thing you see is "Home Lists" screen (where the map is located.)  If the map is not showing, click on the "Show Map" tab to the left and you will see something like this:

Next, click on "Filters" on the top right of the map and it will open a drop-down menu with different options to give you control of what you can see displayed.

 Finally, tick the "Traffic" checkbox and all the streets show colored lines according to the traffic statistics provided by Google:

Clock-In Clock-Out Exception Report

Clock In/Out Exception Report
This report provides details of not only the expected time where the employees had to Clock In or Out, but also the actual time when the punches were entered.  This allows Management to have full control of an employees' activity.
To access the report -- Log into the Web-based application and go to reports:
From the reports menu, under Time and Attendance Reports, select "Clock In/Out Exception Report":

Enter the filters you wish to employ:
Generate your report:


Automatic Send Reports

Automatic Send Reports
All reports sent can be sent to an email address without even accessing the Web Portal. To set up the automatic report schedule, go to the Reports in the web base application, to access, click on "View Scheduled Reports."
Once inside, you will see the screen with all Scheduled Reports (or groups of reports). If it's the first time, it will be empty, but let's change that! Click on the Add button.
The following image illustrates the different fields that you will see on the next screen:
   1. Enter a Description for the Report you are creating.
   2. Use this field to Add/Remove all the reports that you want to include in the same email.
   3. Pick your Time Zone.
   4. Select the period you want the report to be generated at.
   5. Select whether the report is generated indefinitely or if it should end on a specific date.
   6. Here you will select if you want to create a CSV file (Excel Spreadsheet) for each individual report or want the HTML version (similar to generating it online). Then:
     o Email To: Type the email addresses you wish to send the emails to, use commas if you need to list more than one
     o Email Subject: Define the subject of the Email on this area.
     o Email Body: Type the body of your Email here, it will be the same each time.
When done, click SAVE! Once the report is generated, it will be listed on the "Report Schedules" screen. To edit any values, click on"ID" and that should be it.

Editing User Events

Editing User Events
This is a powerful tool for companies that need to edit and add punches in case someone in the staff forgot to clock in to a task or a break.
   To access this feature, go to the Administration tab and click on "Edit User Events" in the "Basic" section.
   Once inside you can use the Team, User and Date filters to find what you need to edit.
In this example, we already have a user that needs some edits done. We are going to cover the four available options:

1. Changing a task
2. Adding a Clock-in and out
3. Inserting a task
4. Inserting a break

1. To edit a task, click in the following icon:
The next step is easy, just select the Task...
...and Subtask (if applicable)...
and then pick your reason for the change before clicking on "Save Changes":

After this, you will see the change reflected immediately:
2. The next thing you can do is insert a Clock in/out event. Keep in mind this has to be done in a time frame where there are no punches.
Click on the button shown above (the one with the small watch) and you will be taken to the following screen:
Here you can select a task and a subtask, just like you did in the previous section:
Also, you need to select the Start and End times along with the reason for the change:
Once you are ready, Save it, then the new punches will be added to the system:
3. Let's say this employee worked on something else during this day, so you need to insert a task in between. The Insert Task Start/End button is your best friend here:
After clicking this button, the next screen will look very familiar, that's because it's the same process that we just did:
Select the appropriate Task, Subtask with its Start and End Times and the reason for the change, and finally click on "Add". Your inserted Task will be added:
4. Of course, we can't forget about breaks or lunches, we need to add a break in between, so the button with the Pause icon is the one that you are looking for:
This one is also very similar to the previous steps we did, the difference is that instead of a Task, you need to select a Break Type (this will vary depending on your setup).
We have chosen a 15 Minute Break and entered the time accordingly. Click on Add and the break will be added to the timesheet:
Finally, let's take a look at how the punches will look like on one of the reports:

As you can see, everything looks perfect!


Important Administrator Settings


The following are enhancements in our admin settings: :

- Timesheet Signoff
- Task Search on Device
- Tracking During Breaks
-Clock-in Photo
-Editing Events through the mobile app

To enable or disable these features, please go to the Administration tab and select "Preferences" on the Basic section.

Scroll to the bottom of the settings and you will find the following options:

Make sure to enable or disable these features according to your company's needs and only if you need them!
Here is a brief description of each feature (click on the links to read the full article): 

-Timesheet Sign off: give employees the ability to sign and approve their hours and have a Manager approve or decline, edit and resubmit these timesheets for re-approval. 
-Task Search on Device:  enable a search functionality within the Tasks List, so employees can punch in to tasks that have been uploaded to teams they don't belong to. 
-Tracking During Breaks: when it's active, the app will continue to track the GPS location of the staff. If disabled, they won't be tracked during breaks. 
-Clock In Photo: if checked, employees must take a picture to be able to clock in for the day.
-Event Edit on Phone:  allow field workers to edit their punches.

Clock-In Clock-Out Alerts

Clock-In Clock-Out Alerts
This feature notifies you if an employee hasn't clocked in or out within a specific time frame. As usual, the setup is done through the Administration tab in the Pacific Timecard Web Portal. Click on "Rules, Action and Fences" and then, once inside, select "Customer Service".

Click on "Add New Customer Service".

Follow the next steps from this image:

Name: Enter the name of the alert
· Users: Here you can either apply the alert for All Users or pick the specific teams or users that it should apply to.
· Rules: The next step after this is clicking on “Create New”. Don’t save it because the alert is not ready yet!

On the next step, you will create the alert, make sure to name it the same as in the previous step for consistency and easier management, for that, use the Name field.

Trigger: Select the appropriate trigger from the Trigger drop down menu. For the purpose of these alerts, use either "Worker Clocked In Outside Allocated Time Window" or "Worker Clocked Out Outside Allocated Time Window".

After selecting the trigger, set the time frame for which the alerts will apply, as shown on the next image. Make sure to select the appropriate time and dates, since these will be the ones used to monitor if the employee has clocked in or out between these times.


The "Trigger Immediately" option will enable the system to alert you if the time frame has started and the user has not clocked in or out (according to your rules). If this is left unchecked, then you will be notify until the user clocks in or out, and not right when the time frame starts.

When you are ready, click on “Create New Action”.

These next steps will show you how to setup an alert so you can get an automated email whenever an employee triggers one of the events we setup on the previous steps. This is what you should see:


Action Name: Enter the name of the alert.

Send Email Alert: You can setup an Email Alert to be sent to any person that you need, just make 
sure to enter the email address on the Email To field. If you are using multiple addresses, separate them with commas. Enter the Email Subject and Body. 

When you are ready, click on "Save".

You will be taken to the previous step, now the ACTIONS dropdown menu will be pre-populated with the Action (Email alert) you just created.

Click on “Save” to continue.

Next, you will be back at the initial screen where you originally named the alert and specified the teams/employees it applies to. The drop down menu will also be pre-populated. If for any reason the drop down menu is blank on this or the previous step, do not worry, if you had created the rule or action, you can just open it and you will find it there.


Click on “Add Existing” to add the rule.

This step is very important because it ties the rule and the alert together,

If you omit this and Save it, then the trigger won’t work properly.

Finally, after clicking on “Add Existing”, your newly created alert will be showing just like in the example. Now you are ready to click on “Save”!

New Enhancement: Bi-weekly Timesheet Signoff

We have a quick announcement to make on this post, we have just implemented a new much requested frequency for the  timesheet signoff :  B...