New Enhancement: Bi-weekly Timesheet Signoff

We have a quick announcement to make on this post, we have just implemented a new much requested frequency for the timesheet signoffBi-Monthly periods.

Adding to the ability to sign timesheets daily, weekly or monthly, we are now able to do it bi-monthly, which means that the app will group the punches together in periods from the 1st and 15th of each month, or the 16th and the end of the month the punches are for. The user can sign it off once the next period starts.

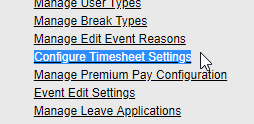
To set this up, we go to the Administration tab and select "Configure Timesheet Settings":


Then, we select the "Bi-Monthly" period:

(Click on the image to enlarge)

When the employee signs his/her timesheets on the device, then all the punches for the specific period will be shown:


The manager that would approve the signed timesheets will also be able to view the periods with the appropriate dates:

(Click on the image to enlarge)

As you can see, it's pretty much the same functionality but with a wider time frame that is intended to be used for companies with bi-monthly payroll periods. Here is what the full timesheet looks like right before the manager approves it:

(Click on the image to enlarge)

Leave us any comments or questions down below, we'll gladly answer them or hear any feedback you might have!


--Econz Team

View User Photos: Filter by Forms

We have just released an update to the View User Photos section in which you can use the "Form" filter to focus on pictures captured in a specific form.

By default, the unfiltered report will show you all of the images and signatures for a given time period:
(Click on image to enlarge)

Let's use the "Form" filter to select the "Location Documentation" form, because we know that today one of our staff members took some pictures for that one:


Once we click on filter, then only the images for "Location Documentation" will be shown, so we won't have to guess anymore!

(Click on image to enlarge)

It's as easy as that! Let us know in case you have any questions or comments.

User Specific Rounding Rules

The new User Specific Rounding Rules feature has just been put in place so companies can apply individual schedules for each employee. The idea behind this is that there may come the need to create time blocks where employees are meant to be payed, and by doing this, the system will only count towards paid hours the time inside the block. Everything outside of it will be ignored, and the punches will match to the actual schedules.

The first step is to enable the functionality, this is done in the Administration tab. Click on "Set quantisation data" and select the "User Defined" option and save it:

To set this up, you need to go to the Field Workers tab and click on the ID of the employee you need to apply a rule for. You will find the following new fields:
  • Payable Start: the time the employee is expected to start the shift and what it will be rounded to it if he/she clocks in before that time.
  • Payable End: the time the employee is expected to end the shift and what it will be rounded to it if he/she clocks out after that time.
  • Shift: here you can pick Day or Night, depending on if the employees work a day or night shift.

Notice that if desired, you can setup just a Start or End rule, it's not mandatory to create both if you don't need to. Also, if the employee clocks in later than the Payable Start time or clocks out earlier than the Payable End time, that will count as starting late or ending early, respectively, and no rounding rules will be applied.

When employees proceed to sign the timesheets, they will see the rounding rules being applied. Here is the Timecard Event Report showing the original times for the punches (clock in at 7:45 AM and clock out at 5:08 PM):


And here is what this employee would see in the Timesheet Signoff screen:


When a manager logs in the web portal to approve the timesheets, the rounding rules will also be applied:
(Click on image to enlarge)

The following reports are the ones that will provide the rounded hours:
  • Timecard Task Event and Location Report
  • Custom Report
  • Timecard Task Focused Custom Report
  • Timecard Detail Report
And we have added a new report called "User Rounding Report", which will give you details of both the actual and the expected start and end times for each employee:


As always, we are working hard to provide you with even more tools to manage your organization. Leave us a comment below in case you have any questions or feedback.

New Feature: Pre-Naming Photos

With this new feature, you will be able to save your employees' time by having them only take pictures and the system will name them automatically.

The default way is that you take a picture, tap on "Submit" and then you are asked to enter a "Picture Description":


To enable the system to pre-name images captured with Pacific Timecard, you need to go to the "Manage Custom Fields/Forms" in the Administration tab. This will work for any Custom Fields that you add, be it Default or Custom Forms.

On this example, we are adding a Default Custom Field (using the "Photo" Field Type, of course) called "Street View". Notice that we are using "Street View" as the Default Value:


Whatever text you put into this Default Value, will be used to name the pictures captured using this specific custom field. Click on Add to create this new field.

Now we are ready to test this with our device, we can go to the "Add Task Info" section and our Street View photo field will be there:


We can then take the picture and when we tap on "Submit", the "Picture Description" prompt will be skipped, so you will see the list of pictures you have taken. Tap "ADD" to capture more images, or "DONE" if you have what you need:


Now we can compare the results, if we checked on the Custom Report, we can see our "photo1.jpg", since we didn't enter a name in that case, and right below it, there's our "photo1-Street View.jpg":

Notice how it used the automatic name without us entering anything!

A new section we recently added in the Administration tab called "View User Photos" will also show us how the files were named (watch out for an upcoming post about this new great feature):

(Click on the image to enlarge)

We hope you like this cool new feature, leave us any comment or question down below!

The New View User Photos Section

Continuing on the same theme of last week, today we bring you another new feature related to pictures, the View User Photos section.

This new functionality will allow you to view all the pictures and signatures captured by all of the users, as well as focus on specific teams, users and date ranges, just like on a report.

To get to View User Photos, go to the Administration tab and you will find the option within the "Staff" section:


Once inside, you will be able to use the different filters to look at all of the available pictures and signatures captured out in the field.

Here is an example of what this report looks like:

(Click on the image to enlarge)

Each image can be clicked on to download it into your hard drive, it's that easy!

Let us know if you have any comments or questions.

Multiple Photos on Forms

Hello everyone!

A little while back we had added some really interesting functionality around taking multiple photos within the Add Task Info section. Now, we have also enabled this functionality when using Custom Forms

It's very easy to enable it, just go to Preferences within the Administration tab, scroll down until you find the option called "Allow Multi Photo":


Make sure to check the tick box and click on "Save".

What this does is that whenever you are taking pictures within a Form, you will be able to add more than one by just tapping the "Add" button.


Check our previous article for more details on how to take multiple pictures.

We hope you like this quality of life enhancement, it's just one of many more to come!

Meal and Rest Compliance Report

Hello everyone! Today we have a quick update about a new report intended to simplify monitoring employees' meal and rest violations: the Meal and Rest Compliance Report.

What this report shows is every instance that an employee did not take a break or that the break taken was too short.

This information will also be available in the SmartFence Triggered Rules Report along with any other alert you have setup, but the Meal and Rest Compliance Report was designed to make it easier to focus only on instances when employees are not in compliance.

To be able to see entries on this report, make sure that rules are setup with either of the following key words, depending on the rules:
  • "Too Short" (used when you want to specify if the user took less than X amount of time of Rest Break or Meal Period).
  • "Not Taken" (used to create an entry after a specific amount of time when the employees and/or the managers can be notified that they must take a break or lunch, or that they have gone over the expected time).
Here is an example of a set of rules that would meet this requirement, so that when they are triggered, they will show up on the Meal and Rest Compliance Report (taken from the Worker Monitoring section within the Rules, Action and Fences screen):


And finally, here is a sample of what the report looks like whenever one of these rules are triggered:


Leave us any questions or comments down below, we hope you like this great new feature!

Team Member Task Change Message

Hello everyone!

Today we have a quick but interesting one for you, it is newly added functionality available with our Pacific Timecard mobile application version 8.9 and above.  If you are a Supervisor using Team Clock-in, you can now change the tasks of all the clocked in crew members with one easy step.

Here is how it goes: the Supervisor with the device would only need to be clocked in and have some users clocked in, then, the moment he/she selects "Change Task" and picks the relevant Task/SubTask, a pop up message will appear:


If the user selects "YES", then the clocked in team members' task/subtask will be changed to the one the supervisor is changing to. Otherwise, they will remain in the same job they are at.

Keep in mind that in order to punch people to individual different tasks, it still needs to be done through the "Team Clock-in" section in the menu, since each task will need to be selected manually, but in the cases everyone will switch to the same activity, this is the fastest and most convenient way to do it.

We hope you like this feature, leave us any thoughts in the comments section below.


Update to Custom Fields: Hidden Fields and Making Them Editable

On this post we are going to talk about a new feature that we just implemented: the ability to add Hidden Custom Fields.

Why would you want to hide Custom Fields from the mobile device? Well, this feature goes very well together with adding Custom Fields to the Edit User Events section, so there might be some additional codes or notes that only Managers need to add, so to avoid employees from seeing unnecessary fields, you can use this functionality as follows:

Go to "Manage Custom Fields/Forms" in the Administration tab:


Then select "Edit Default Custom Fields":


In this example, we already have a couple of fields that employees can see:


Let's go ahead and add a new hidden field, this will be called "Eligible for Premium Pay" and we will set it up as "Hidden" using the "On Phone/PDA" dropdown menu. Once you are happy, click on the "Add" button:

So here we have our three custom fields, two are editable from the mobile app, and one is hidden:


Let's go ahead and make this field available so a Manager or Admin can edit it. Go to the "Event Edit Settings" in the Administration tab:


Then use the dropdown menu to add the desired field (Note that at the moment the supported fields are the "Yes/No" and "List" types). You will be able to add not just hidden but editable or required fields, as well, depending on your needs. For this guide, we will use our new hidden field, so we click on Add:


Once that is done, next time you go to edit a user's timesheets, you will be able to click on this button, which will show you the custom fields that are available for editing:


After adjusting the values of the fields as necessary and clicking on Save, the changes will be reflected immediately on any report dedicated to custom fields, such as the Custom Report or the Custom Field Report:

Leave us any comment or question, we hope you get the best out of this new enhancement!

Midnight Event Report

We have recently added a new report which we are sure you will find very useful: the Midnight Event Report.

The idea behind it is that it will show you all of the punches for a specific time period that cross midnight in the local time zone of the field worker in question. As with most of the reports, this one can be filtered by team, user and start and end dates, as well.

To find it, go to the Administration tab and look for the "Midnight Event Report" at the bottom of the "Time And Attendance Reports" section:


Once inside, you will be able to either generate it online or create a CSV file with the filters of your choice. Here is a sample of the sort of data the report will provide:

(Click on image to enlarge)

Keep in mind that it will show you the start and end times of exactly the task the employee was in while crossing midnight, not the entire shift.

Let us know if you have any comments or questions, look forward for more updates to come!

New Enhancement: Bi-weekly Timesheet Signoff

We have a quick announcement to make on this post, we have just implemented a new much requested frequency for the  timesheet signoff :  B...